Publishing an online biodiversity atlas based on GBIF data
How I installed a website to discover Jamaican biodiversity with open source tools (QGIS, PostgreSQL, Ubuntu, GeoNature-atlas) and GBIF open data
Author : Jordan Sellies (Intern at Ecrins national park, from BTS SIO in Gap, France) / May 2019
Contributors : Théo Lechémia, Gil Deluermoz, Camille Monchicourt (Informations system at Ecrins national park, Gap, France),
Amandine Sahl (Informations system at Cevennes national park, Florac, France)
INTRODUCTION
GBIF (Global Biodiversity Information Facility) is an international network and research infrastructure funded by the world’s governments and aimed at providing anyone, anywhere, open access to data about all types of life on Earth (https://www.gbif.org/what-is-gbif).
GeoNature-atlas is an open source web application that was developed by Ecrins national park in 2016 to publish its biodiversity observations to everyone (Github / Biodiv'Ecrins).
We'll combine both open ressources to create a repeatable example of online biodiversity atlas in an area of the world (Jamaica in our example).
As a French tool, GeoNature-atlas was initially based on French taxonomic reference classification Taxref.GeoNature-atlas is working based on PostgreSQL databases materialized views. So we could have changed the definitions of the materialized views to adapt it to GBIF backbone and data.
Another solution could have been to change many parts of GeoNature-atlas source code to plug it directly to GBIF API.
But the aim of this Proof of Concept (POC) was to publish an atlas based on the tool without changing its database nor its code and to make it repeatable.
 Working on this POC motivated us to improve GeoNature-atlas with making it multilingual, adapt it to GBIF data and backbone, translate settings and
documentation into English. This work is ready now, in a dedicated branch, to be released soon.
While discovering GBIF rich environment, tools and data, we also used its API combined with the one of Wikidata to include datasets information and media into our Jamaican atlas. Another POC done in the main time confirmed the power of GBIF API and linked data.
When our first tests on Jamaican biodiversity atlas were done, we decided to verify it repeatability on another area.
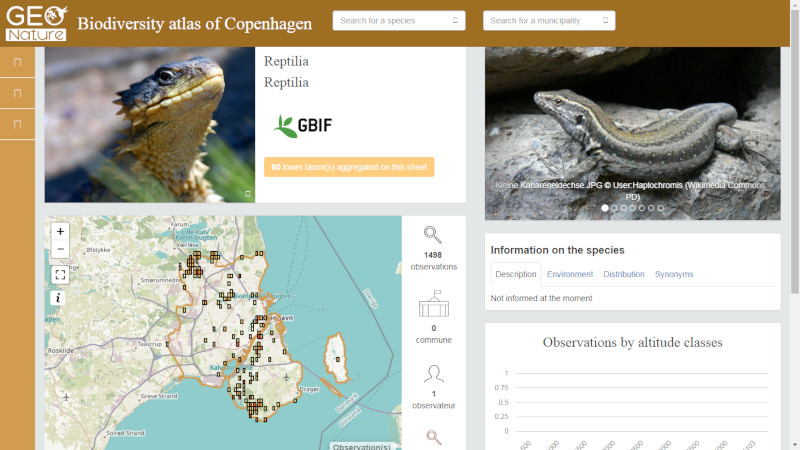
So we started to install another instance of GeoNature-atlas based on GBIF data in Copenhagen and its suburb to publish another GBIF biodiversity atlas in less than 2 days.
We wanted to show that with sharing open source tools and open data, we can easily create websites understandable by everyone, in a common approach.
And making it possible for countries, states or cities that want to highlight, share and spread their local biodiversity with an open
and easy to use website.
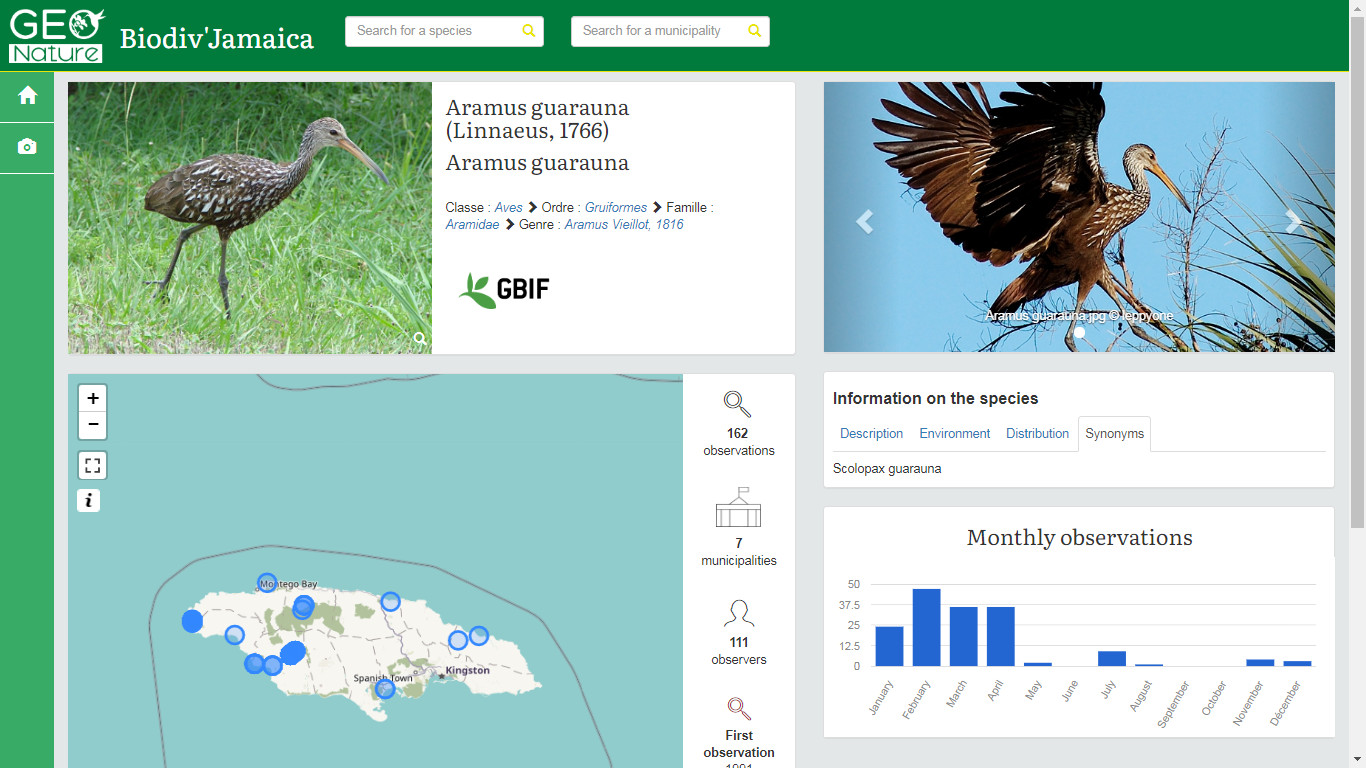
Biodiv'Jamaica (Online result): http://jamaica.geonature.fr
Biodiv'Copenhagen (Online result): http://copenhagen.geonature.fr
It's your turn now, let's start your biodiversity atlas on the area of your choice!
You will need:
- A linux environment
- GBIF occurencies data in your area
- GBIF backbone taxonomy as list of species
- SIG layer of municipalities, territory and grids of your area
Table of content:
- 1. DATA
- 2. INSTALL ENVIRONMENT and DATABASE
- 3. IMPORT DATA INTO DATABASE
- 4. INSTALL and CUSTOMIZE GeoNature-atlas
- 5. GET OBSERVERS and MEDIA FROM API
- 6. UPDATE GBIF DATA
- 7. PERSPECTIVES
1. DATA
a. Download GBIF data in the area of your choice
Go to https://www.gbif.org and login (create an account if you don't already have one).
Go to GET DATA page (Occurrencies) and search data you want to use
(Location = Jamaica in our case - https://www.gbif.org/occurrence/search?country=JM).
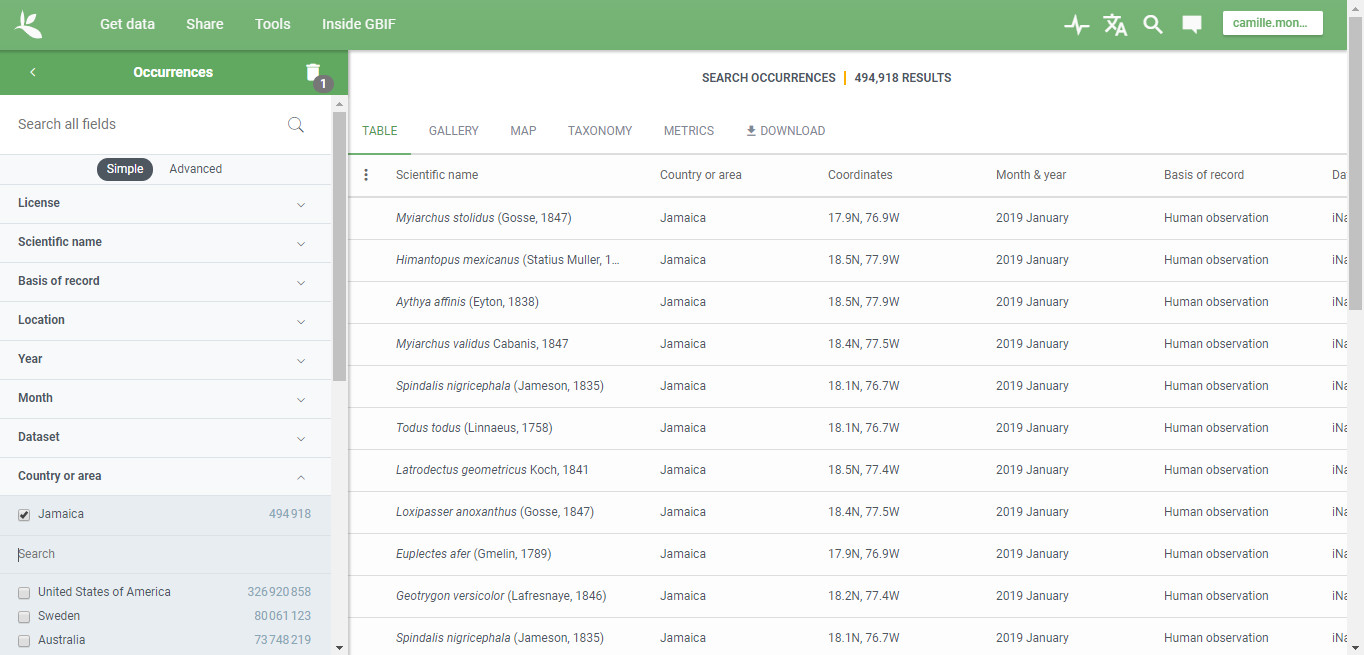
Then click on DOWNLOAD button.
GBIF offers 2 formats of data for download. We used the smallest one which contains only data after GBIF interpretation (CSV).
The DOWNLOAD page also displays interesting details about data quality and issues.
Once you clicked on CSV, you will get some information about agreement and citation requirements. Then the ZIP file will be prepared. You can wait on that page for the file to be ready or wait for the download email to be received.
Once ready, you will be able to download the CSV file in a ZIP file.
b. You can open the CSV file in QGIS to check data
QGIS is an open source GIS software that is now a reference worldwide.
It allows to open, edit, create and analyse spatial data from several formats (Shapefiles, GPX, KML, CSV, GeoJson, PostGIS...).
It also allows to display basemaps from internet services (OpenStreetMap, BING, Mapbox...) and to display vector files on it.
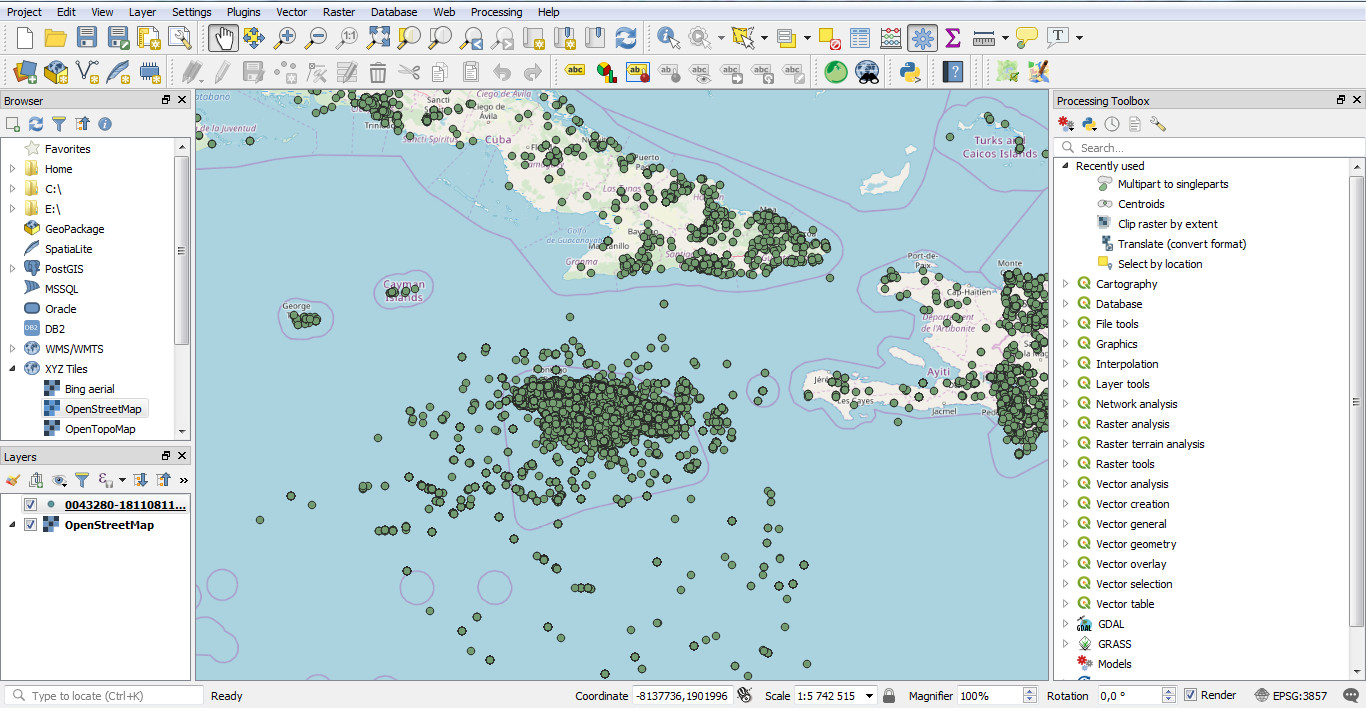
Open QGIS, add a basemap (XYZ tiles / Openstreetmap as an example), then open the CSV file with Data source manager / Delimited text,
select the CSV file and then set the right settings (Encoding, File format, Point coordinates fields and Geometry CRS) :
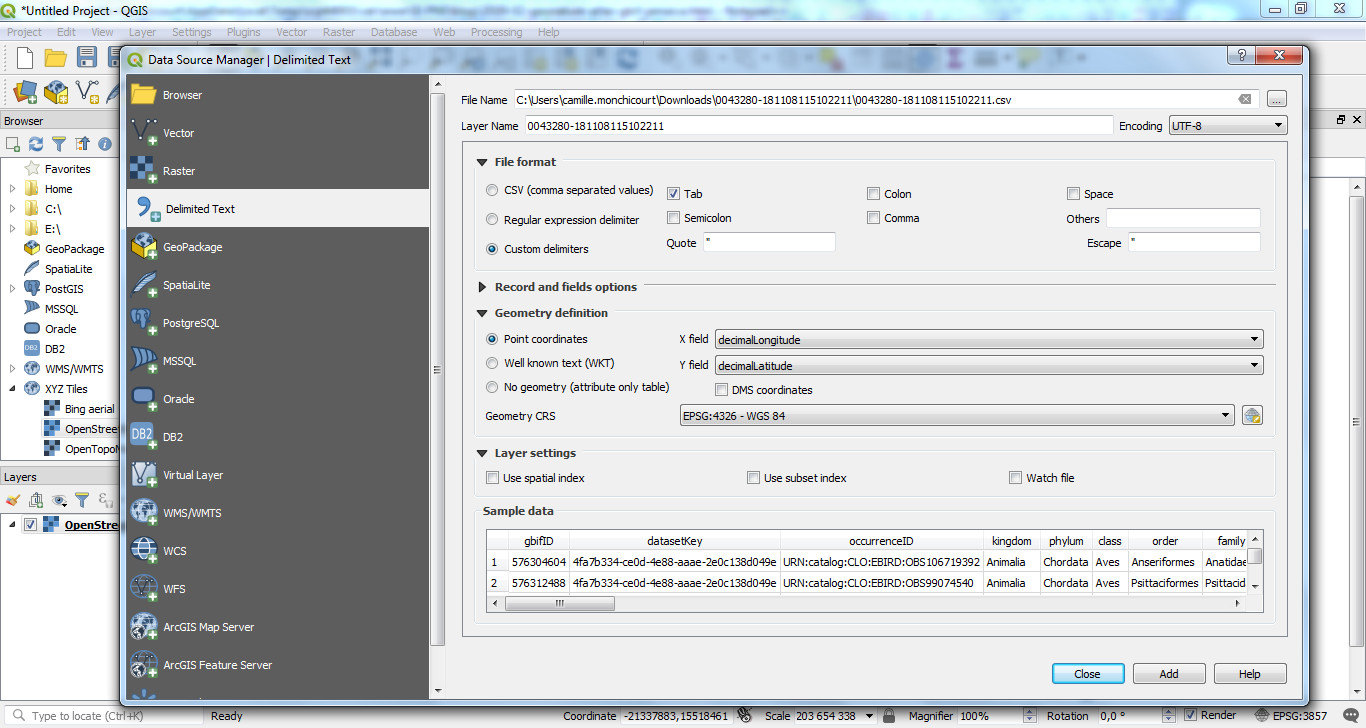
Click on ADD and your data are now displayed on the map.
c. Download administrative areas
You will also need a shapefile layer with municipalities and another one with the territory of you area.
You can download data from OpenStreetMap (the world biggest collaborative and open geographical data).
In our case we used DIVA-GIS to download municipalities of our area. Then we fused the municipalities with QGIS to get our area territory.
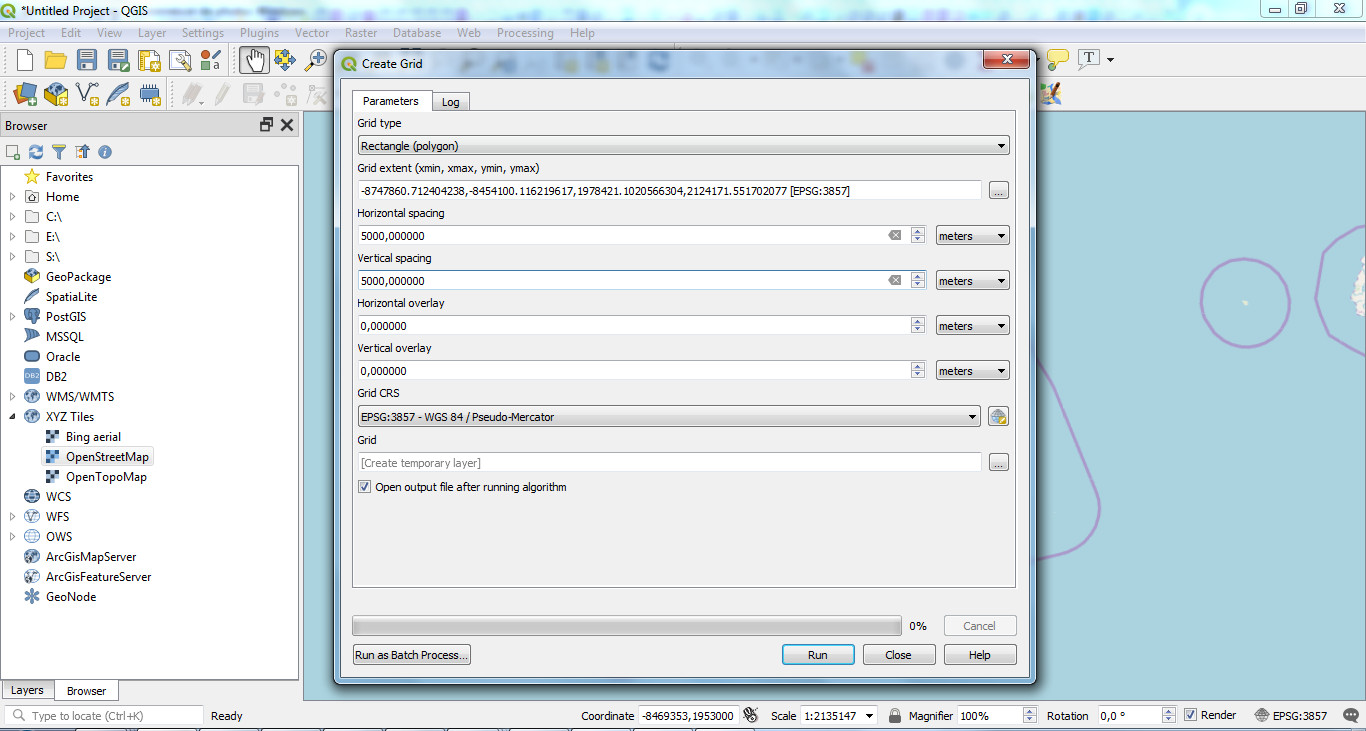
You will also need grids from your area to display data on map at a large scale. We'll create them with QGIS.
Vector / Research tools / Create grid
Choose "Rectangle (polygon)" as Grid type, set the grid extent (from a layer extend or from the canvas) and the spacing between each grid (5000 meters in our example):
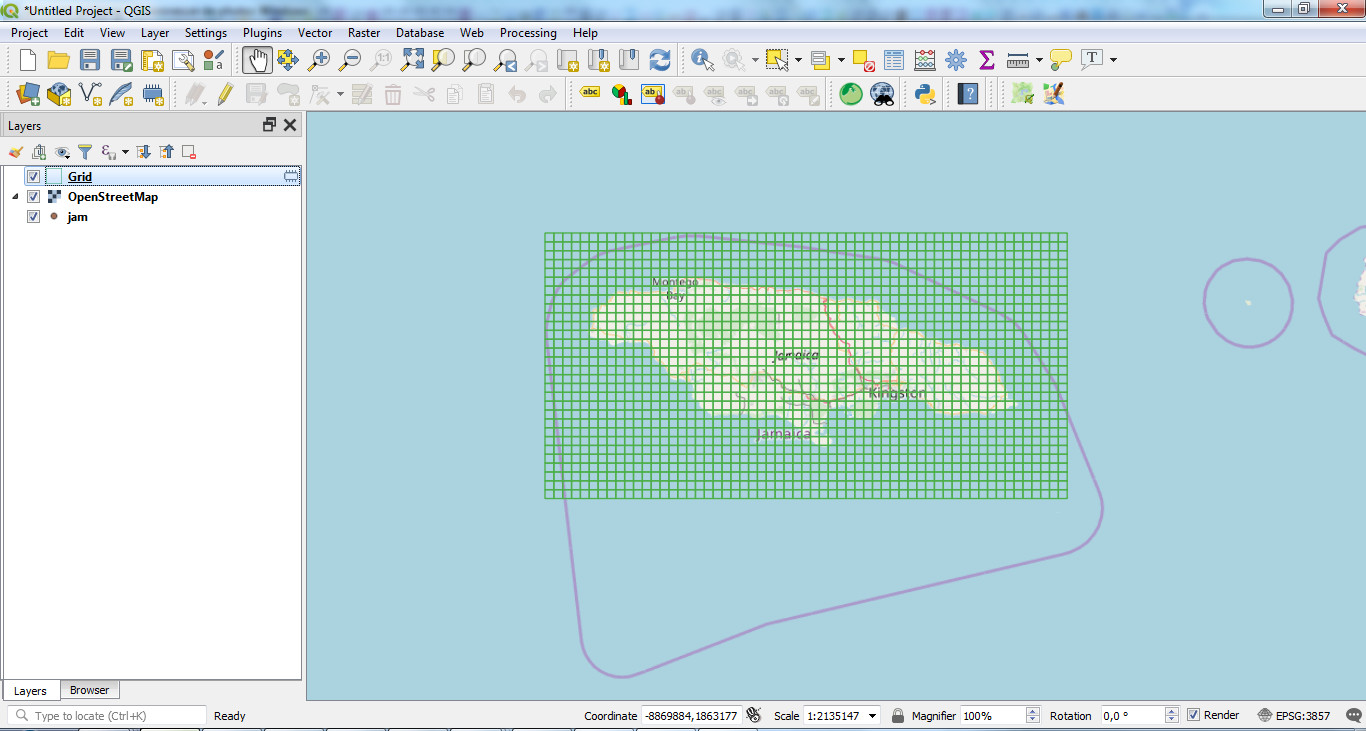
It will create the grid for your area that you can export as a shapefile:
2. INSTALL ENVIRONMENT and DATABASE
You can install GeoNature-atlas locally to test it or on a remote host to make it available on internet.
The installation scripts are designed for Debian (8 or 9) and Ubuntu (18). Other linux distributions can work, but you will have to adapt installation scripts.
If you need to learn how to create a Linux user, check the dedicated documentation.
Actually the international version used here is only available in a dedicated branch (multilingue). It will be integrated in a proper release.
Actually the official documentation is only available in French (https://github.com/PnX-SI/GeoNature-atlas/blob/multilingue/docs/installation.rst).
It is being translated in English but we'll detail the installation procedure here.
Download and unzip the source code from the actual dedicated branch:
cd /home/MYLINUXUSER
wget https://github.com/PnX-SI/GeoNature-atlas/archive/multilingue.zip
unzip multilingue.zip
Rename the application folder (atlas in our example):
mv GeoNature-atlas-multilingue atlas
Launch the environment script that will install PostgreSQL, PostGIS 2, Apache 2 and Python 2.7.
cd /home/MYLINUXUSER/atlas
./install_env.sh
Install the database.
# Copy the example database setting file
cp main/configuration/settings.ini.sample main/configuration/settings.ini
Edit the database setting file
main/configuration/settings.ini.- You can change PostgreSQL database owner and user names and their passwords. They will be created by the database installation script.
- Leave
localhost as database host so it will be installed on the same host as the application.- Upload your territory shapefile as
data/ref/territoire.shp (or fill its path in limit_shp)- Upload your municipalities shapefile as
data/ref/communes.shp (or fill its path in communes_shp)- Upload your grids shapefile as
data/ref/custom_maille.shp (or fill its path in chemin_custom_maille)-
geonature_source=false-
metropole=false-
install_taxonomie=true
Once done, launch the database creation script:
sudo ./install_db.sh
3. IMPORT DATA INTO DATABASE
To access and manage GeoNature-atlas database we used pgAdmin local software.
By default a PostgreSQL database only accepts connections from its local host.
To manage the database from your local computer, open database connections with the dedicated documentation.
Import the GBIF backbone taxonomy into database
The GBIF Backbone Taxonomy, is a single synthetic management classification with the goal of covering all names GBIF is dealing with. It includes more than 5 millions taxons names and details. We'll download the 'simple' backbone version from http://rs.gbif.org/datasets/backbone/readme.html#simple.
wget http://rs.gbif.org/datasets/backbone/backbone-current-simple.txt.gz -P /tmp
# Unzip the file
gzip -d /tmp/backbone-current-simple.txt.gz
Create an additional schema in the GeoNature-atlas database where you will import all your GBIF raw data, before inserting them into GeoNature-atlas tables.
CREATE SCHEMA gbif;
Create GBIF backbone table (based on https://github.com/gbif/checklistbank/blob/master/checklistbank-mybatis-service/src/main/resources/backbone-ddl.sql).
CREATE TABLE gbif.backbone (
 id int PRIMARY KEY,
 parent_key int,
 basionym_key int,
 is_synonym boolean,
 status text,
 rank text,
 nom_status text[],
 constituent_key text,
 origin text,
 source_taxon_key int,
 kingdom_key int,
 phylum_key int,
 class_key int,
 order_key int,
 family_key int,
 genus_key int,
 species_key int,
 name_id int,
 scientific_name text,
 canonical_name text,
 genus_or_above text,
 specific_epithet text,
 infra_specific_epithet text,
 notho_type text,
 authorship text,
 year text,
 bracket_authorship text,
 bracket_year text,
 name_published_in text,
 issues text[]
)
Copy backbone CSV content into
gbif.backbone table.
sudo -n -u postgres -s psql -d-c "copy gbif.backbone from '/tmp/backbone-current-simple.txt';"
Create the table where you will load GBIF observations data from the CSV file downloaded before.
CREATE TABLE gbif.gbifjam
(
  "gbifID" integer,
  "datasetKey" character varying,
  "occurrenceID" character varying,
  kingdom character varying,
  phylum character varying,
  class character varying,
  "order" character varying,
  family character varying,
  genus character varying,
  species character varying,
  "infraspecificEpithet" character varying,
  "taxonRank" character varying,
  "scientificName" character varying,
  "countryCode" character varying,
  locality character varying,
  "publishingOrgKey" character varying,
  "decimalLatitude" double precision,
  "decimalLongitude" double precision,
  "coordinateUncertaintyInMeters" double precision,
  "coordinatePrecision" double precision,
  elevation double precision,
  "elevationAccuracy" double precision,
  depth double precision,
  "depthAccuracy" double precision,
  "eventDate" character varying,
  day integer,
  month integer,
  year integer,
  "taxonKey" integer,
  "speciesKey" integer,
  "basisOfRecord" character varying,
  "institutionCode" character varying,
  "collectionCode" character varying,
  "catalogNumber" character varying,
  "recordNumber" character varying,
  "identifiedBy" character varying,
  "dateIdentified" character varying,
  license character varying,
  "rightsHolder" character varying,
  "recordedBy" character varying,
  "typeStatus" character varying,
  "establishmentMeans" character varying,
  "lastInterpreted" character varying,
  "mediaType" character varying,
  issue character varying
);
Upload the CSV file on your host in /tmp/ folder.
sudo -n -u postgres -s psql -d geonatureatlascp -c "\copy gbif.gbifjam from '/tmp/MY-GBIF-DATA-FILE.csv' DELIMITER E'\t' CSV HEADER"
UPDATE atlas tables and materialized views with GBIF data (gbif.gbifjam) and backbone (gbif.backbone)
Execute queries from the gbif.sql file.
Some parts can be long so we recommand to execute it query by query.
The latest queries of this file will manage permissions of database users. So you have to edit the query with your database user name.
4. INSTALL and CUSTOMIZE GeoNature-atlas
cd /home/MYLINUXUSER/atlas/
./install_app.sh
Create and edit Apache configuration file for your atlas
sudo nano /etc/apache2/sites-available/atlas.conf
and copy this inside:
# Replace myurl.com by your domain
ServerName myurl.com
<Location />
    ProxyPass http://127.0.0.1:8080/
    ProxyPassReverse http://127.0.0.1:8080/
</Location>
Then activate this configuration and restart Apache
sudo a2ensite atlas.conf
sudo apachectl restart
To customize the application, edit the application configuration file main/configuration/config.py.
Make sure to update at least the database_connection.
To apply changes to this file, launch the command sudo supervisorctl reload
Several other settings can be changed.
See default configuration file for more details.
It is also possible to add some HTML static pages, accessible from the left sidebar.
You can also customize CSS, static templates contents and images in static/custom/ folder.
NOTE: If you update .potranslation files from translations folder, you have to rebuild it:
cd /home/myuser/geonatureatlas
source venv/bin/activate
pybabel compile -d translations
deactivate
5. GET OBSERVERS and MEDIA FROM API
We will get observers from GBIF dataset API through dataset_key from GBIF observations data.
We will also get media (such as photos) with SPARQL queries on Wikidata API.
The scripts are available in https://github.com/PnX-SI/GeoNature-atlas/commit/18a240aa3b0ff9c19103cacb742f0e96f1833984.
Install virtual environment
cd data/script_gbif
virtualenv -p /usr/bin/python3 venv #Python 3 is not required
source venv/bin/activate
pip install lxml psycopg2 requests SPARQLWrapper xmltodict
Edit the configuration file data/script_gbif/config.py with URI connection (set user = owner_atlas).
Launch import scripts (Can be long like a few hours):
# Query GBIF API to import occurrencies observers
python import_gbif_citation.py
# Query media from Wikimedia (ask a media for each taxon in database)
python import_wikidata.py
6. UPDATE GBIF DATA
How to update GBIF data regulary
The data import was done once from a downloaded file at one time. GBIF data are updated regulary.
That's why using the API automatically would have kept the atlas up-to-date with GBIF data.
Until this perspective, we have to reimport GBIF data manually regulary to update our online atlas.
- Login on GBIF GET DATA again and download a new CSV of occurrencies with the same filters as before. See Download data previous section if needed.
- Load the CSV into a new table in GBIF schema of the database. See Import data previous section if needed.
- Empty
synthese.synthesefftable in order to insert the updated data from the new CSV.
DELETE FROM synthese.syntheseff
- Insert GBIF data into
synthese.synthesefftable. See SQL in previous sections. - Refresh all materialised views + atlas.vm_taxref + taxonomie.bib_noms as done in initial import.
- Relaunch Wikidata photo import script in case you have new species in your data.
- Import metadata again
7. PERSPECTIVES
There are still some points to improve and ideas to go further:
- We could display GBIF WMS map and GBIF occurrencies media such as in this POC.
- We could fill species description with using API of other sources (EOL, wikidata...).
- We could add altitudes to data with intersecting it with a DEM to include an observations altitude repartition chart as we have in French atlas.
- We have to finish English documentation and application translation of GeoNature-atlas and release it.
- We could also install and use TaxHub to manage taxons medias and descriptions.
- We could also use TaxHub that is able to generate smaller thumbnails and cache of API images that are actually displayed in original size, sometimes very big and slow to load.
- We could use GeoNature to create and manage data.
- GeoNature-atlas is already used in several areas of France (Mercantour, Vanoise, Ecrins, Normandie Maine, Pays de la Loire, Languedoc-Roussilon, Auvergne-Rhône-Alpes). Now that it is multilingual and can work with GBIF data, it could be used in several other areas of the world to highlight local biodiversity, its richness but also the importance to preserve it.
Thanks for reading and we hope to hear about your GBIF biodiversity soon.
